Exercise 2
This guide will allow you to put the learning from lessons 4 - 6 into practice. It will walk you through the process of:
- Opening a new branch and making changes there
- Stashing these changes to safely switch branches
- Rebasing your branch to tidy your commit history
This exercise operates on the expectation that you have completed exercise 1, if not, please do so and return to this guide.
Stashing changes
- Within your IDE, open the project directory and enter the following in your integrated terminal:
git checkout -b exercise-2 # this will create and switch to a new branch for this exercise - Let’s make a change to this branch. Add the text “This is a test” to the README file via your IDE or simplt enter:
echo -e "\n This is a test" >> README.md - Save your change then enter:
git add . # this will add all of the changed files within the current directory to staging - Next we’ll commit this change by entering:
git commit -m "This is the first change" - Verify the presence of this commit by entering:
git log - Let’s make a second change:
echo -e "\n This is the second test" >> README.md -
Hit save but do NOT add this change to staging.
- Now we will attempt to move back to our main branch:
git checkout mainThis should result in an error:
error: Your local changes to the following files would be overwritten by checkout: README.md Please commit your changes or stash them before you switch branches. Aborting - Let’s stash the uncommited changes before switching to main:
git stashThen:
git checkout main - You should observe that the changes made in your branch are not reflected in main. Let’s switch back to our test branch:
git checkout exercise-2 - Now we can continue on our stashed changes by entering:
git stash apply - Let’s commit the changes:
git commit -m "This is the second change"
Rebasing
- Let’s examine our current git log:
git logIt should resemble the following image:
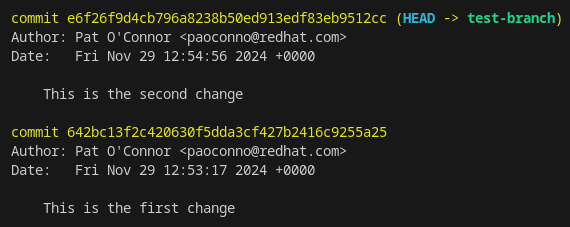
-
Let’s imagine we’d made several more changes for a review for example. Ideally, we would like to preserve a neat commit history when working on branches. Let’s attempt to rebase to facilitate this.
- In the log, we can observe that it’s the two most recent commits we want to adjust. Enter the following:
git rebase -i HEAD~2 # -i is the flag for "interactive" and "HEAD~2" specifies the 2 most recent commits on the HEAD -
This will open an interactive nano window within your terminal. It should resemble the below screenshot:
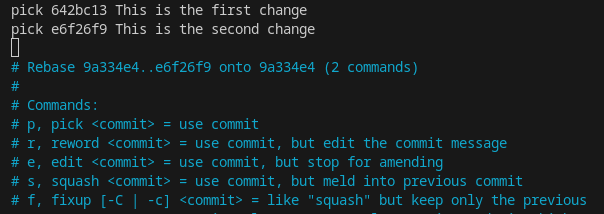
The instructions within should be self explanatory but in this case we want to squash the second commit into the first one.
-
Change the word “pick” next to the second commit to “squash”. You can also use single letters as outlined within the nano file. Use ctrl+x to save and then confirm to perform the rebase.
-
You will then be presented with an additional nano view where you can see both commit messages. In this view, remove the second commit message and corresponding comment.
-
Change the remaining commit message to: “This is the combined commit” and save.
- To verify the rebase run:
git log -
The output should be similar to the below screenshot:

We’ve now successfully combined both commit and changed the message to reflect this.
- Finally, let’s push these changes to a remote branch:
git push origin exercise-2 --force-with-lease # we don't need this here but normally would if the remote branch had commits